Distance Measurement using Ultrasonic Sensor and Arduino with LCD display | Distance Meter
Hello friends! Welcome back to ElectroDuino. This blog is base on Distance Measurement using Ultrasonic Sensor and Arduino with LCD display | Distance Meter. Here we will discuss Introduction to Distance Measurement using Ultrasonic Sensor and Arduino /Distance Meter, Project Concept, Block Diagram, components required, circuit diagram, working principle, and Arduino code.
Introduction
A distance measurement system or Distance Meter is an electronic device that can measure distance without actual contact and easily used at several places, like water level measurement, distance measurement, etc. This device is use an ultrasonic sensor to measure the distance. It can measure any object distance from it in the range of 2 – 400 cm. We can see the measuring distance on the display. The measure distance value is in Cm and Inch unit.
Project Concept
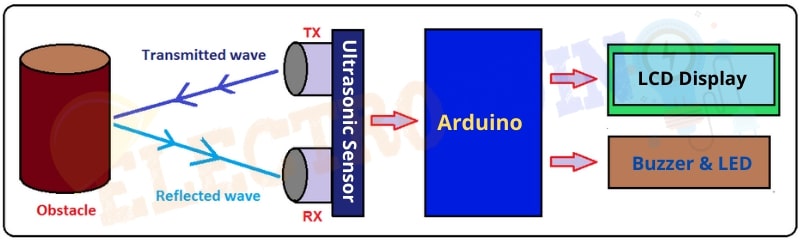
The key components of the project are the Ultrasonic Sensor, Arduino microcontroller, LCD Display, buzzer, and LED. The ultrasonic sensor is a distance measurement device which is measure distance by generating and receiving sound wave. Here it is used to measure distance. The Arduino microcontroller controls the whole system. The LCD display is used to print the measuring distance. The buzzer and LED are used as an indicator. The Arduino reads the data from the Sensor and prints the measuring distance on the display. If any object is existing at out of the detection range of the ultrasonic sensor then the buzzer and LED are turn on.
Block Diagram of Distance Measurement using Ultrasonic Sensor and Arduino with LCD Display
Components Required
| Components Name | Quantity |
| Arduino Nano | 1 |
| Ultrasonic Sensor | 1 |
| 16×2 LCD Display | 1 |
| 10k Potentiometer |
1 |
| Buzzer |
1 |
| Red LED |
1 |
| 220 ohm Resistor |
2 |
| Toggle or Slide switch | 1 |
| 9-volt Battery with Battery Connector | 1 |
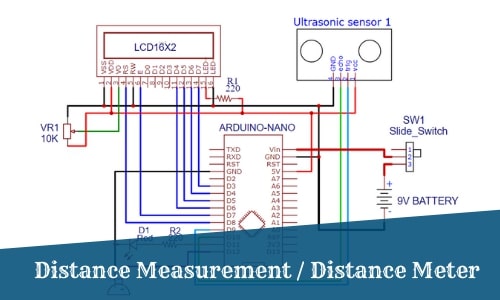
Circuit Diagram of Distance Measurement using Ultrasonic Sensor and Arduino with LCD display
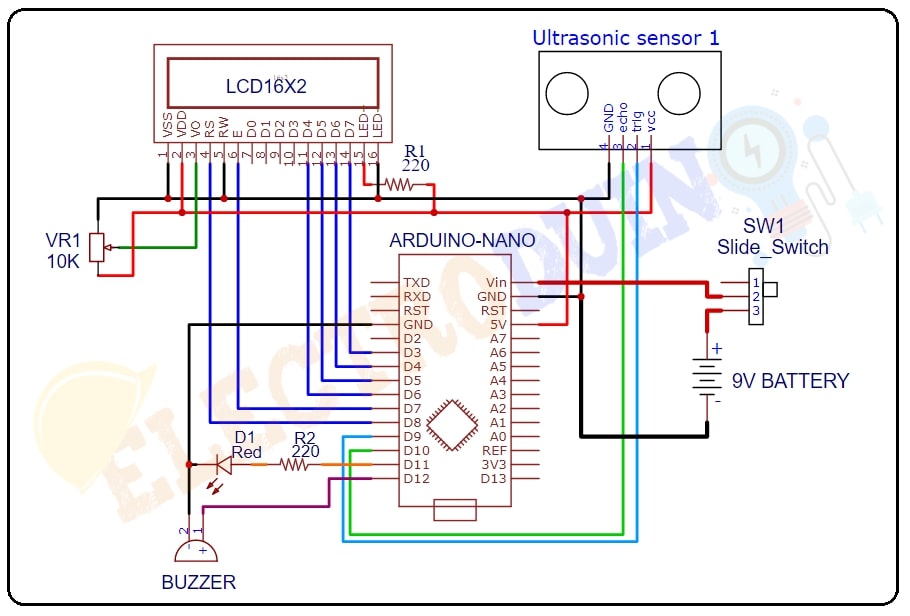
Circuit Wiring
| Components Pin | Arduino pin |
| Ultrasonic sensor VCC pin, LCD Display (Vdd, LED +) Pins | Arduino 5V Pin, but LCD Display LED + Pins connected to Arduino 5V Pin through 220ohm resistor. |
| Ultrasonic sensor GND pin, LCD Display (Vss, Rw and LED -) Pins | GND (ground) Pin |
| Ultrasonic sensor Trig pin | Digital Pin “D9” |
| Ultrasonic sensor Echo pin | Digital Pin “D10” |
| LCD Display RS, E, D4, D5, D6, D7 | Respectively Digital Pin “D8”, “D7”, “D6”, “D5”, “D4”, “D3” |
| LCD Display V0 pin | 10k Potentiometer Signal pin, Potentiometer one pin is connected to 5V and another pin is connected to GND(ground) |
| LED positive (+) terminal | Connected to Arduino digital pin “D11” through a 220 ohm resistor. |
| Buzzer positive (+) terminal | Connected to Arduino digital pin “D12” |
| LED and Buzzer negative (-) terminal | GND (ground) Pin |
| 9v battery positive (+) terminal | Connected to Arduino “Vin” pin through a slide switch |
| 9v battery negative (–) terminal | GND (ground) Pin |
Working Principle of Distance Measurement using Ultrasonic Sensor and Arduino with LCD display
After connecting all the components according to the circuit diagram and uploading the code on Arduino, now turn on the power supply. At the same time, the ultrasonic sensor starts emitting sound waves from the transmitter part. When any object comes in front of the sensor then the sound wave reflects back from the object surface to the sensor receiver part. Now the ultrasonic sensor sens the reflected sound wave and the sensor echo pin produce a high pulse output. This output pulse duration is equal to the time difference between the transmitted sound wave and the received sound wave.
Then the Arduino read the high pulse output from the sensor echo pin. This way Arduino calculates the time duration and measure the distance.
s = (v x t)/2
Where s = distance between the sensor and object. v = speed of sound in Air (0.034cm/µs or 340 m/s) . t = the sound waves take time to reflect back from the object surface. We need to divide the distance value by 2 because time will be double as the waves travel and reflect back from the object.
Then Arduino prints the distance value on the LCD display in the Cm and Inch unit. The ultrasonic sensor can measure distance in the range of 2 cm to 400 cm. When the object present outside of this distance range, this time buzzer and LED will turn on and indicate the object is present outside of the distance range.
|
For more Details: Interfacing Ultrasonic Sensor with Arduino | Ultrasonic Sensor Arduino Code |
Arduino Code
/*
Distance Measurement using Ultrasonic Sensor
Distance Meter
http://www.electroduino.com
*/
//libraries for LCD Display
#include <LiquidCrystal.h>
// Define LCD display pins
LiquidCrystal lcd(8,7,6,5,4,3);
#define trigpin 9 // Define sensor trig pin is connected to Pin 9
#define echopin 10 // Define sensor Echo pin is connected to Pin 10
#define LEDpin 11 // Define LED is connected to Pin 11
#define buzzerpin 12 // Define Buzzer is connected to Pin 12
//Define variables
float time=0,distanceCm=0,distanceInch=0;
void setup()
{
pinMode(LEDpin,OUTPUT); // Set LED pin as OUTPUT
pinMode(buzzerpin,OUTPUT);// Set Buzzer pin as OUTPUT
lcd.begin(16,2);
pinMode(trigpin,OUTPUT); // Set Trig pin as OUTPUT
pinMode(echopin,INPUT); // Set Echo pin as INPUT
// Print massage on LCD Display
lcd.print("Distance Meter");
delay(2000);
lcd.clear();
lcd.print(" Electroduino ");
delay(2000);
}
void loop()
{
lcd.clear();
// Ultrasonic sound transmitter and Receiver
// & calculate the time period
digitalWrite(trigpin,LOW);
delayMicroseconds(2);
digitalWrite(trigpin,HIGH);
delayMicroseconds(10);
digitalWrite(trigpin,LOW);
delayMicroseconds(2);
time=pulseIn(echopin,HIGH);
distanceCm=time*340/20000; // Distance value in CM
distanceInch= distanceCm/100;// Distance value in M
// Print Distance value on LCD Disply in CM unit
lcd.clear();
lcd.print("Distance:");
lcd.print(distanceCm);
lcd.print("cm");
// Print Distance value on LCD Disply in M unit
lcd.setCursor(0,1);
lcd.print("Distance:");
lcd.print(distanceInch);
lcd.print("m");
delay(2000);
// when distance greater than 400 cm or less than 2cm
if ( distanceCm > 400 || distanceCm < 2)
{
// Print message on LCD Disply in CM unit
lcd.print(" Distance ");
lcd.setCursor(0,1);
lcd.print("Out of Range");
digitalWrite(buzzerpin,HIGH); // buzzer ON
digitalWrite(LEDpin,HIGH); // LED ON
delay(2000);
}
else
{
digitalWrite(buzzerpin,LOW); // buzzer OFF
digitalWrite(LEDpin,LOW); // LED OFF
}
}