Interfacing DHT11 with Arduino | DHT11 Temperature and Humidity sensor Arduino Code
Hello friends! Welcome back to ElectroDuino. This blog is based on Interfacing DHT11 with Arduino | DHT11 Temperature and Humidity sensor Arduino Code. In the previous blog post, we were discussing the “DHT11 Temperature and Humidity Sensor Module“. Here we will discuss how to use the DHT11 with Arduino, Circuit diagram, and DHT11 Temperature and Humidity sensor Arduino Code.
Introduction
Interfacing the DHT11 Sensor with Arduino is helps to read temperature and humidity from a DHT11 sensor. It is the first step to understanding how to use a DHT11 sensor in different projects. At first, we will learn how to connect a DHT11 sensor module with Arduino and write a simple DHT11 Temperature and Humidity sensor Arduino Code to read the temperature and humidity from the sensor. Here we will measure room temperature and humidity and print these values on the serial monitor window of the Arduino IDE.
Components Required
| Components Name | Quantity |
| Arduino UNO (you can use other types of Arduino like Arduino Nano, MEGA, pro mini, etc) | 1 |
| Arduino USB Cable (USB A to B) |
1 |
| DHT11 Temperature and Humidity Sensor Module | 1 |
| Connecting wires | As required in the circuit diagram |
DHT11 Temperature and Humidity Sensor Module Pinout

| For More Details: DHT11 Temperature and Humidity Sensor Module |
How to use DHT11 Temperature and Humidity with Arduino
Using a DHT11 sensor with Arduino is really very simple. First of all, we will connect the DHT11 sensor VCC pin to the Arduino +5v pin and connect the ground pin to Arduino GND (ground) Pin. Now the sensor is activated and ready to measure Temperature and Humidity. Now, we need to read the output data from the sensor output pin. The DHT11 sensor is a digital output sensor. So we need to connect the sensor DATA pin to any one of the digital pins of the Arduino. Here we will connect the sensor Out pin to the digital pin “D4” of the Arduino for reading Temperature and Humidity value.
Circuit Diagram of DHT11 Temperature and Humidity and Arduino
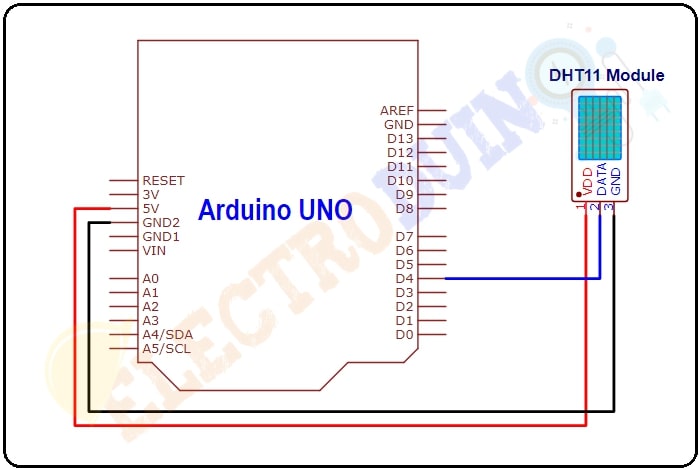
Circuit Wiring
| PIR Sensor Pin | Arduino Pin |
| Vcc Pin | + 5v Pin |
| GND Pin | GND (ground) pin |
| DATA Pin | Digital pin “D4” |
DHT11 Temperature and Humidity sensor Library Download and Install
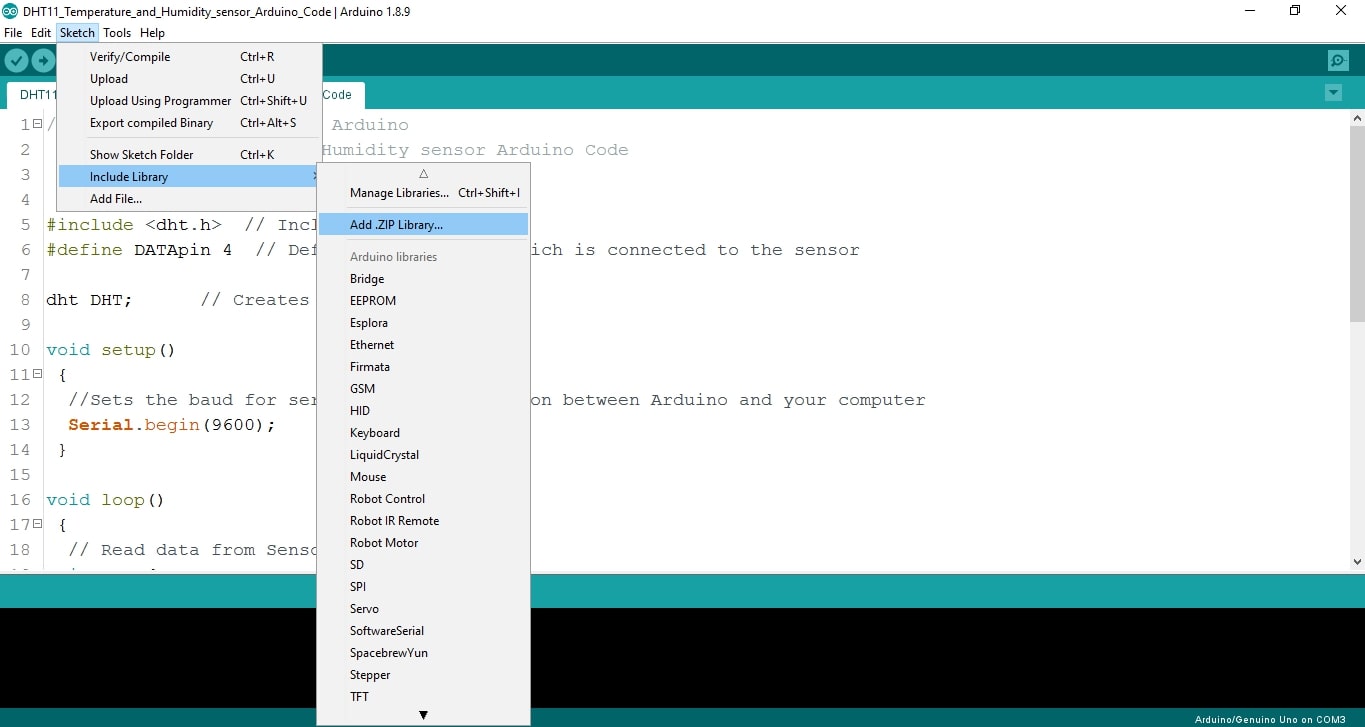
Before, write the Arduino Code we need to install ” dht.h ” DHT11 sensor Library in our Arduino IDE Software. You can Download the Library file by click on the Download Button.
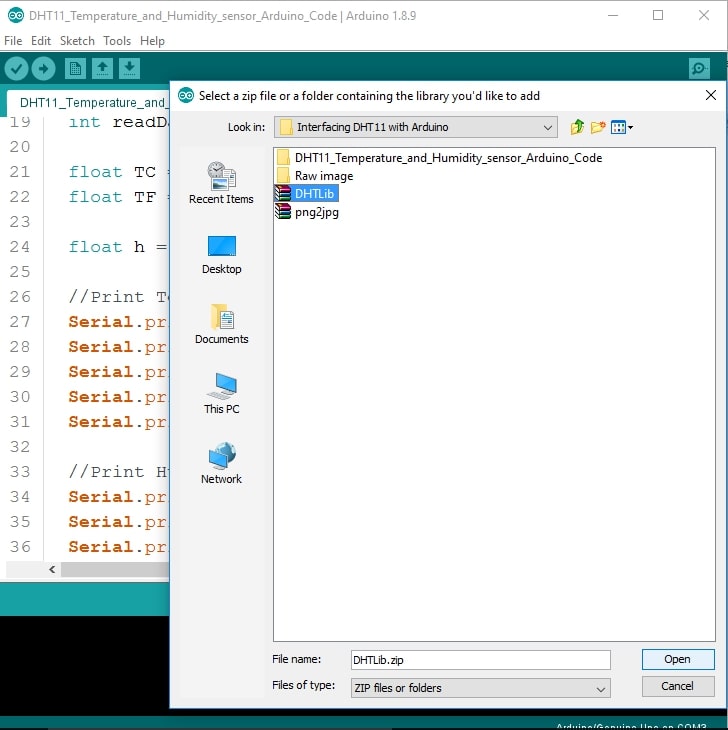
Open the Arduino IDE, go to Sketch > Include Library > Add .ZIP Library, and then select the DHTlib ZIP file that you just downloaded.
Step1
Step2
Step3: When Library installation will be successfully completed, then you get ” Library added to your libraries. check Include Library menu” Message on your Arduino IDE Below Bar.
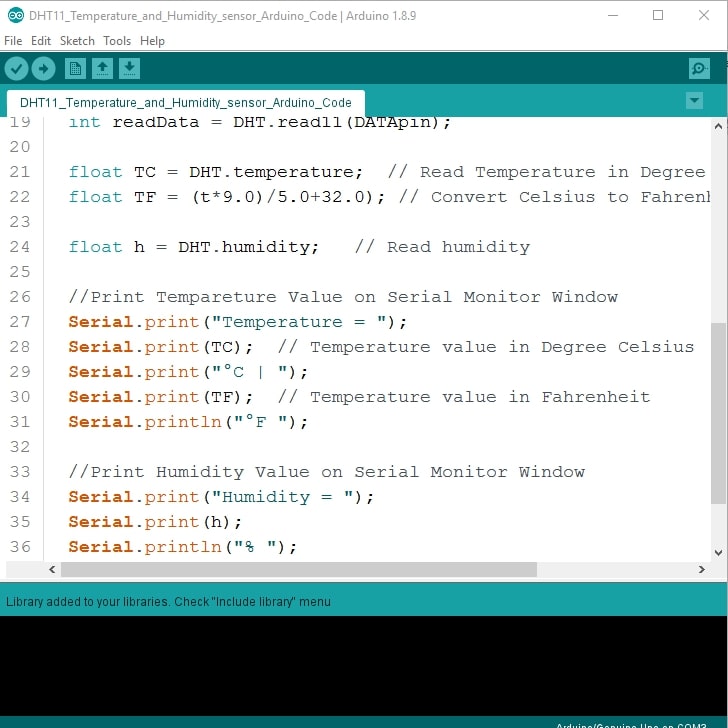
DHT11 Temperature and Humidity sensor Arduino Code
/* Interfacing DHT11 with Arduino
   DHT11 Temperature and Humidity sensor Arduino Code
   WWW.Electroduino.com  */

#include <dht.h>  // Include DHT11 library
#define DATApin 4  // Defines Arduino pin which is connected to the sensor

dht DHT;      // Creates a DHT object

void setup()
 {
  //Sets the baud for serial data transmission between Arduino and your computer
  Serial.begin(9600);
 }

void loop()
 {
  // Read data from Sensor
  int readData = DHT.read11(DATApin);

  float TC = DHT.temperature;  // Read Temperature in Degree Celsius unit
  float TF = ((TC*9.0)/5.0+32.0); // Convert Celsius to Fahrenheit unit

  float h = DHT.humidity;   // Read humidity

  //Print Tempareture Value on Serial Monitor Window
  Serial.print("Temperature = ");
  Serial.print(TC);  // Temperature value in Degree Celsius
  Serial.print("°C | ");
  Serial.print(TF);  // Temperature value in Fahrenheit
  Serial.println("°F ");

  //Print Humidity Value on Serial Monitor Window
  Serial.print("Humidity = ");
  Serial.print(h);
  Serial.println("% ");
  Serial.println("");

  delay(2000); // wait two seconds
}
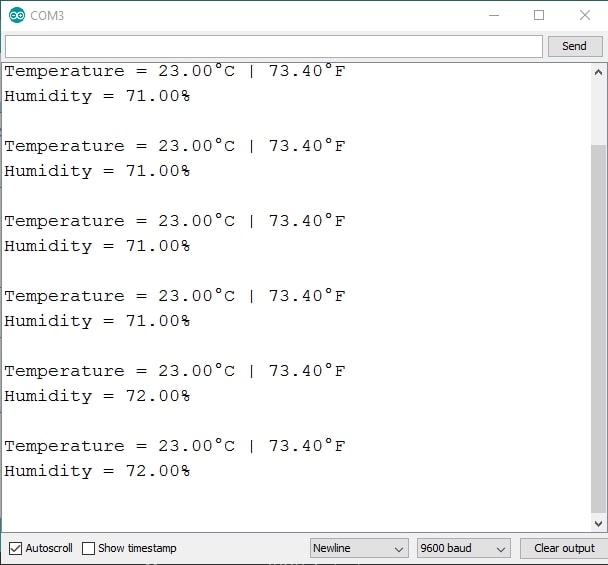
Output Result
After successfully completed the code upload on your Arduino. Now go to the Arduino IDE software and open the Serial monitor Window, then you will get here the Temperature and humidity value.