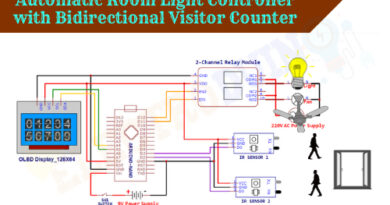
Bidirectional Visitor Counter using Arduino
Hello friends! Welcome back to ElectroDuino. This blog is based on the Bidirectional Visitor Counter with Automatic Gate Control System. Here we will discuss Introduction to Bidirectional Visitor Counter Using Arduino, Project Concept, Block Diagram, Components Required, Circuit Diagram, working principle, and Arduino code.
Introduction
Many times, we have seen a gatekeeper in a shopping mall, hall, large restaurant, office, or parking area holding a 4-digit hand tally counter to manually count the number of visitors to these places. But this is a very tedious task and there is a possibility of many calculation errors in this process.
To overcome this problem, in this project we will be going to build a Bidirectional Digital Visitor Counter. It is used to count the number of Visitors entering a shopping mall, hall, large restaurant, office, or parking area at the entrance gate. This system counts the total number of visitors/people entering through the entry gate and also the total number of visitors/people leaving through the exit gate. Also, it counts the total number of visitors/people currently present inside the place.
Project Concept/Overview
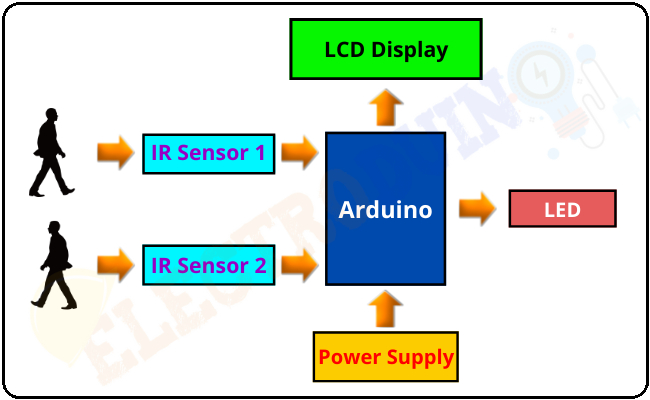
This is an Arduino based very simple project, a few major components are needed to build this project. These major components are Arduino, two IR sensors, and an LCD display. Here we are using an Arduino board which acts as the main microcontroller to control this system. A pair of IR sensors are used to detect the visitor from both directions, i.e., it detects the number of entering visitors and the number of exiting visitors. The LCD Display is used to display the total number of entering visitors, the total number of exiting visitors, And also shows the total number of visitors currently present inside the place.
Block Diagram of Bidirectional Visitor Counter using Arduino
Components Required
| Components Name | Quantity |
| Arduino NANO | 1 |
| IR Sensor Module | 2 |
| 16×2 LCD Display Module | 1 |
| 220 ohm Resistor (R1, R2) | 2 |
| 10K ohm Potentiometer (VR1) | 1 |
| Red LED | 1 |
| 5v Buzzer | 1 |
| 9v Power Supply | 1 |
| Rocker Switch | 1 |
| PCB board | 1 |
| Connecting wires | As required in the circuit diagram |
Tools Required
| Tools Name | Quantity |
| Soldering Iron | 1 |
| Soldering wire | 1 |
| Soldering flux | 1 |
| Soldering stand | 1 |
| Multimeter | 1 |
| Desoldering pump | 1 |
| Wirecutter | 1 |
Software Required
 | Arduino IDE (Integrated Development Environment) |
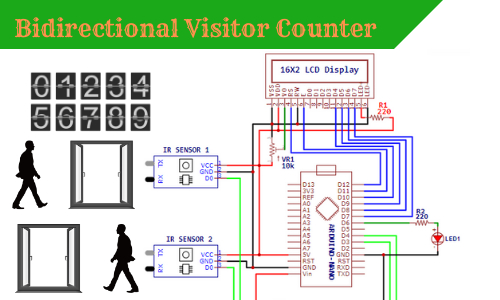
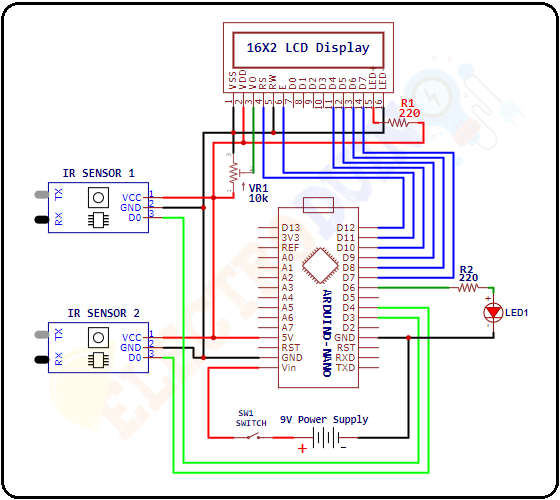
Circuit Diagram of Bidirectional Visitor Counter using Arduino
Working Principle
First of all, we need to set one IR sensor (IR sensor-1) at the entry gate and another one (IR sensor-2) set at the exit gate. Normally when IR sensors do not detect any obstacle, it produces a HIGH (1) output value from the Output Pin.
When a visitor enters through the entry gate the IR sensor-1 detects the visitor (obstacle) and produces a Low (0) output value from the Output Pin. Then the Arduino read this value and counts 1+ using the code. Similarly, When the IR sensor-1 detects another visitor (obstacle), the Arduino increment the counting by 1+. In this way every time the Arduino adds +1 in the count when a visitor passes through this gate and calculates the total number of entering visitors.
In the same way, when a visitor leaves through the exit gate the IR sensor-2 detects the visitor (obstacle) and produces a Low (0) output value from the Output Pin. Then the Arduino read this value and counts 1+ using the code. Similarly, When the IR sensor-2 detects another visitor (obstacle), the Arduino increment the counting by 1+. In this way every time the Arduino adds +1 in the count when a visitor passes through this gate and calculates the total number of exiting visitors.
Every time Arduino Subtracts the total number of entering visitors from the total number of exiting visitors to calculate the total number of visitors currently present inside the place.
After counting and calculating all numbers the Arduino sends data to the 16×2 LCD Display. The LCD Display shows the total number of entering visitors, the total number of exiting visitors, and the total number of visitors currently present inside the place. The LED starts glowing when no one is present inside that place.
Arduino Code
 /* Bidirectional Visitor Counter using Arduino
    www.Electroduino.com
 */

#include<LiquidCrystal.h> //library for LCD Display

LiquidCrystal lcd(12, 11, 10, 9,8, 7); //define pins for LCD Display

#define inSensor 4   //define IR Sensor 1 pins onnnected to D4
#define outSensor 3  //define IR Sensor 2 pins onnnected to D3
#define LED_1 6      //define LED pins onnnected to D6

//Variables
int inStatus;
int outStatus;

int in;
int out;
int now;

int countin = 0;
int countout = 0;


void setup()
{
  lcd.begin(16,2); //Initialise the LCD to 16x2 Character Format

  //Set Components pin modes
  pinMode(inSensor, INPUT);
  pinMode(outSensor, INPUT);
  pinMode(LED_1, OUTPUT);

  digitalWrite(LED_1, HIGH); // LED ON

  //Print beginning message on LCD Display
  lcd.setCursor(0,0);
  lcd.print("   Welcome!!!   ");
  lcd.setCursor(0,1);
  lcd.print("  ELECTRODUINO  ");
  delay(3000);

  lcd.clear();
  lcd.setCursor(0,0);
  lcd.print(" Bidirectional  ");
  lcd.setCursor(0,1);
  lcd.print("Visitor Counter");
  delay(3000);
}

void loop()
{
  inStatus =  digitalRead(inSensor);  // Read IR Sensor 1 Output
  outStatus = digitalRead(outSensor); // Read IR Sensor 1 Output

  // Count the number of entering visitors
  if (inStatus == 0)
  {
    digitalWrite(LED_1, HIGH); //LED ON
    delay(200);
    in = countin++;
  }

  // Count the number of exiting visitors
  if (outStatus == 0)
  {
    digitalWrite(LED_1, HIGH); //LED ON
    delay(200);
    out = countout++;
  }

  //calculate currently visitors present inside the place
  now = in - out;

  //Function for when no visitors inside the room
  if (now <= 0)
  {
    digitalWrite(LED_1, HIGH); //LED ON

    //Print Data on LCD Display
    lcd.clear();
    lcd.setCursor(0,0);
    lcd.print("   No Visitor  ");

    lcd.setCursor(0,1);
    lcd.print("IN:");
    lcd.setCursor(4,1);
    lcd.print(in);

    lcd.setCursor(8,1);
    lcd.print("OUT:");
    lcd.setCursor(13,1);
    lcd.print(out);
    delay(500);
  }

  // Function for when visitors entering and exiting
  else
  {
    digitalWrite(LED_1, LOW); //LED OFF

    //Print Data on LCD Display
    lcd.clear();
    lcd.setCursor(0,0);
    lcd.print("IN:");
    lcd.setCursor(4,0);
    lcd.print(in);

    lcd.setCursor(8,0);
    lcd.print("OUT:");
    lcd.setCursor(13,0);
    lcd.print(out);

    lcd.setCursor(0,1);
    lcd.print("Current = ");
    lcd.setCursor(9,1);
    lcd.print(now);
    delay(500);
  }
}