
Temperature Based Fan Speed Controller and Monitoring using Arduino
Hello friends! Welcome back to ElectroDuino. This blog is based on the Temperature Based Fan Speed Controller and Monitoring using Arduino. Here we will discuss the Introduction to the Temperature Based Fan Speed Controller, Project Concept, Block Diagram, Components Required, Circuit Diagram, Working Principle, and Arduino Code.
Introduction
The Temperature based fan speed controller system has a wide range of applications in different fields. This system can be used in Store Room, Server Room, Industry, and laboratory, as well as it can be used in our Room and Offices. This system is very useful for that closed places where we need to constant the temperature. For example, in the server room, the machines are continuously running and produce heat which increases the room temperature. In this high temperature Machines can be damaged. But using the temperature based fan speed controller system we can control the room temperature and protect our machines from damage. This system measures the surrounding temperature and controls the fan speed to maintain the temperature. This device controls the fan speed according to the room temperature. Whenever the room temperature is increased, the fan speed is also increasing Automatically. And when the temperature is decreased, the fan speed also decreased automatically. In this way, this system controls the temperature.
This project is sponsored by PCBWay.com. It’s a Professional grate PCB prototype service company. They are providing you 10 high-quality PCBs at only 5$. At first register on the website, then fill in all the specifications like Dimensions, Layers, Thickness, color, and Quantity. In the last upload your Gerber files and place your Order Now. After completing all the processes, they produce your PCB prototype within 24 hours.
So, order now to get a high-quality PCB prototype quickly from PCBWay.com

Project Concept of Temperature Based Fan Speed Controller System
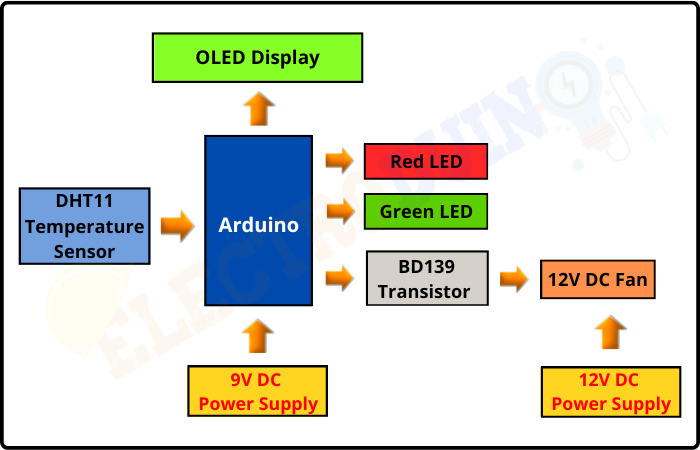
The Temperature based Automatic fan speed control system is a very easy and compact project, few components are needed to build this project. The key components of this project are Arduino, DHT11 temperature sensor, BD139 Transistor, 12V DC Fan, OLED Display, and LEDs. Here we have used Arduino as the main microcontroller, it is at the heart of this project as it controls all functions. The DHT11 Temperature sensor is used to measure the surrounding temperature and sends data to the Arduino. Arduino calculates the temperature using this data, then it generates pulse-width modulation (PWM) signal and gives to the BD139 Transistor. The BD139 transistor acts as a controller switch, it creates a voltage according to the PWM input which controls the speed of the fan.
The fan speed is directly proportional to the surrounding temperature. When the temperature is increasing the fan speed is also increased and when the temperature is decreasing the fan speed is also decreased. We can show the temperature values and fan speed levels on the OLED display. The LEDs are used to indicate the changes.
Block Diagram of Temperature Based Fan Speed Controller System
For this project you should know:
BD139 Transistor – Pinout, Specifications, Datasheet
DHT11 / DHT22 Temperature and Humidity Sensor Module
Interfacing DHT11 with Arduino | DHT11 Temperature and Humidity sensor Arduino Code
DHT11 Temperature and Humidity Sensor Arduino Code with LCD Display
Components Required
| Components Name | Quantity |
| Arduino NANO (you can use other types of Arduino like Arduino UNO, MEGA, Pro mini, etc) | 1 |
| DHT11 Temperature Sensor | 1 |
| BD139 Transistor | 1 |
| 0.9″ OLED Display Module | 1 |
| 1K ohm Resistor (R1) | 1 |
| 10uf/16v Electrolytic Capacitor | 1 |
| 10K ohm Potentiometer (VR1) | 1 |
| Red LED (D1) | 1 |
| Green LED (D2) | 1 |
| DC Water Pump | 1 |
| 9v Power Supply | 1 |
| 12v Power Supply | 1 |
| Slide Switch | 1 |
| PCB board | 1 |
| Connecting wires | As required in the circuit diagram |
Tools Required
| Tools Name | Quantity |
| Soldering Iron | 1 |
| Soldering wire | 1 |
| Soldering flux | 1 |
| Soldering stand | 1 |
| Multimeter | 1 |
| Desoldering pump | 1 |
| Wirecutter | 1 |
Software Required
|
|
Arduino IDE (Integrated Development Environment) |

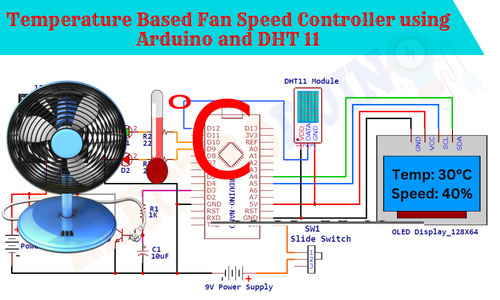
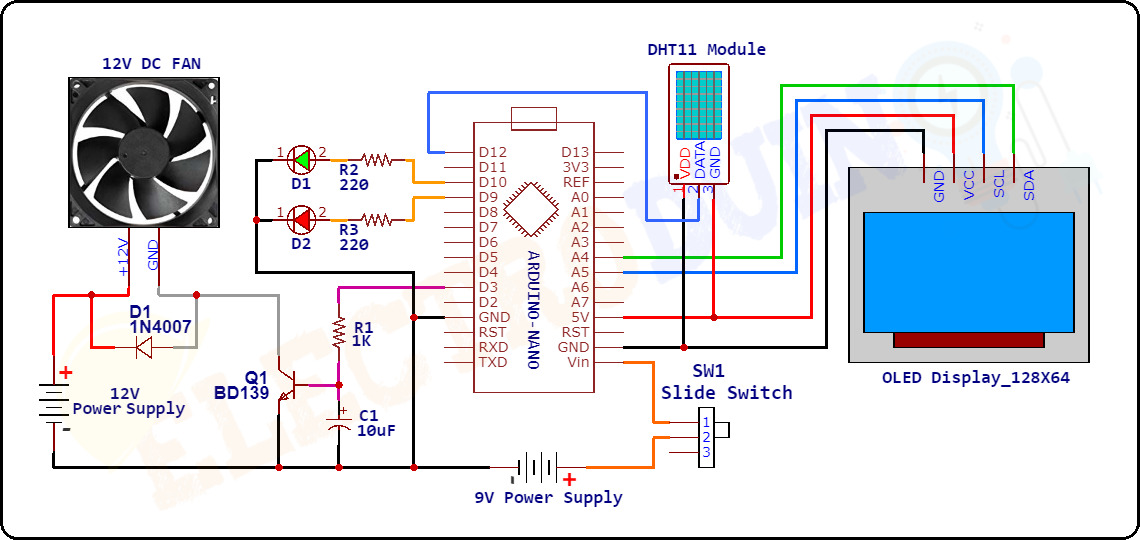
Circuit Diagram of Temperature Based Fan Speed Controller System
Required Library
We need to add 3 libraries in Arduino IDE software. These are:
- Download Library for DHT11 Sensor ” dht.h “
- Download the Adafruit_GFX.h library here: CLICK
- Download the Adafruit_SSD1306.h library here: CLICK
Working Principle of Temperature-Based Fan Speed Controller System
After connecting all the components according to the circuit diagram now our temperature based fan speed control system is ready to work. When we give the power supply to the circuit, the DHT11 temperature sensor starts sensing the surrounding temperature and generates Output values from the Data pin which gives to the Digital Pin D12 of the Arduino. Using these output values the Arduino calculates the temperature in Celcius unit.
When the Arduino detects the temperature value is around 25°C then it starts generating low-frequency Pulse-Width Modulation (PWM) signal from the digital pin D3. This pin is connected to the base terminal of the BD139 translation. As resulting the transistor is activated which gives the voltage to the DC Fan and the fan starts rotating at low speed. At this time Arduino gives +5V (HIGH) to the Green Led which turns ON the Green LED, which indicates the fan starts running.
The duty cycle of the PWM signal is varied according to the change in temperature. When the temperature is increasing continuously then the duty cycle of the PWM signal is increasing which includes the fan speed. In this way, Arduino controls the fan speed with the changes in temperature.
When the temperature is 50°C then the Arduino generates PWM signal with 100% duty cycle which rotates the fan at the full speed.
Whenever the temperature is cross 50°C, then the Arduino gives +5V (HIGH) to the Red Led which turns ON the Red LED, which indicates the temperature is very High.
The temperature values and fan speed levels are simultaneously displayed on the OLED Display.
Arduino Code
/* Temperature Based Fan Speed Controller and Monitoring using Arduino
   WWW.Electroduino.com  */
 //OLED Display libraries
 #include <SPI.h>
 #include <Wire.h>
 #include <Adafruit_GFX.h>
 #include <Adafruit_SSD1306.h>

 #define SCREEN_WIDTH 128    // OLED display width, in pixels
 #define SCREEN_HEIGHT 64    // OLED display height, in pixels
 #define OLED_RESET 4

 Adafruit_SSD1306 display(SCREEN_WIDTH, SCREEN_HEIGHT, &Wire, OLED_RESET);


#include <dht.h>    // Include DHT11 library
#define DATApin 12  // Defines Arduino pin which is connected to the sensor
dht DHT;            // Creates a DHT object

 int Fan = 3;       // Fan is connect to Arduino Pin D3 (PWM)
 int GreenLed = 10;  // Green LED is connect to Arduino Pin
 int RedLed = 9;     // Red LED is connect to Arduino Pin D9

 int TempMin = 25;   // the temperature to start the fan 0%
 int TempMax = 50;   // the maximum temperature when fan is at 100%
 int FanSpeed;
 int fanLCD;

void setup()
 {
  //Sets the baud for serial data transmission between Arduino and your computer
  Serial.begin(9600);

     //initialize with the I2C addr 0x3C (128x64)
   display.begin(SSD1306_SWITCHCAPVCC, 0x3C);
   display.clearDisplay();
   delay(10);

   pinMode(Fan, OUTPUT);
   pinMode(RedLed, OUTPUT);   // initialize digital pin RedLed as an output.
   pinMode(GreenLed, OUTPUT); // initialize digital pin GreenLed as an output.

      // Print text on display
   display.clearDisplay();
   display.setTextSize(1);
   display.setTextColor(WHITE);
   display.setCursor(25,0);
   display.println("ELECTRODUIN0"); // Print text
   display.setCursor(10,20);
   display.println("Temperature Based");
   display.setCursor(3,35);
   display.println("Fan Speed Controller");
   display.display();
   delay(2000);
 }

void loop()
 {
  // Read data from Sensor
  int readData = DHT.read11(DATApin);
  int Temp = DHT.temperature;  // Read Temperature in Degree Celsius unit

  //Print Tempareture Value on Serial Monitor Window
  Serial.print("Temperature = ");
  Serial.print(Temp);  // Temperature value in Degree Celsius
  Serial.println("°C");

  if(Temp < TempMin)     // if Temp is lower than TempMin
    {
       FanSpeed = 0;      // fan is not spinning
       analogWrite(Fan, FanSpeed);
       fanLCD=0;
       digitalWrite(Fan, LOW);      // fan is not spinning
       digitalWrite(GreenLed, LOW); // turn off Green LED
    }

   // if Temperature is higher than TempMin and lower than TempMax
   if((Temp >= TempMin) && (Temp <= TempMax))
     {
       FanSpeed = Temp;//map(Temp, tempMin, tempMax, 0, 100); // the actual speed of fan//map(temp, tempMin, tempMax, 32, 255);
       FanSpeed=1.5*FanSpeed;
       fanLCD = map(Temp, TempMin, TempMax, 0, 100);  // fan speed Show on display
       analogWrite(Fan, FanSpeed);   // spin the fan at the fanSpeed speed
       digitalWrite(GreenLed, HIGH);  // turn on Green LED
       delay(1000);
     }

   // if Temp is higher than TempMax
   if(Temp > TempMax)
     {
      digitalWrite(RedLed, HIGH);  // turn on Red LED
      digitalWrite(GreenLed, LOW); // turn off Green LED
     }
   else
     {
      digitalWrite(RedLed, LOW); // turn off Red LED
     }
   // Print text on display
   display.clearDisplay();
   display.setTextSize(1);
   display.setTextColor(WHITE);
   display.setCursor(0,0);
   display.println("ELECTRODUINO"); // Print text
   display.setTextSize(2);
   display.setCursor(0,20);
   // Print Temperature
   display.println("Temp:");
   display.setCursor(60,20);
   display.println(Temp);  // Temperature Value
   display.setCursor(95,20);
   display.println((char)247);
   display.setCursor(110,20);
   display.println("C");
   // Print Fan Speen
   display.setCursor(0,40);
   display.println("FANS:");
   display.setCursor(60,40);
   display.println(fanLCD); // Fan Speed Value
   display.setCursor(110,40);
   display.println("%");
   display.display();
   delay(2000); // wait two seconds
}


