DS18B20 Temperature Sensor Arduino
Hello friends! Welcome back to ElectroDuino. This blog is based on Interfacing DS18B20 Waterproof Temperature Sensor with Arduino. In the previous blog tutorial, we discussed the “DS18B20 Waterproof Temperature Sensor”. Where we have learned what is DS18B20 Waterproof Temperature Sensor, Its pin diagram, working principle, specifications, technical features, and applications. Here we will discuss How to use the DS18B20 with Arduino, Circuit diagram, How to Measure Temperature, DS18B20 Arduino Code, and Display Temperature Values on the Serial Monitor.
Introduction
Basically, the DS18B20 temperature sensor is a 1-wire Waterproof Digital Temperature Sensor. It can measure the TEMPERATURE between -55°C to 125°C with an accuracy of +-0.5°C. Not only is this Sensor low-cost and easy to use, but it also has 1 wire communication protocol which is easy to build and supports a wide range of devices. Using this Sensor we can build different types of devices where temperature measurement is required. But before building advanced projects or devices using the DS18b20 temperature sensor, first of all, we need to learn how to interface the DS18B20 Waterproof Temperature Sensor with a microcontroller.
Components Required
| Components Name | Quantity |
| Arduino UNO (you can use other types of Arduino like Arduino Nano, MEGA, pro mini, etc) | 1 |
| Arduino USB Cable | 1 |
| DS18B20 Waterproof Temperature Sensor | 1 |
| 4.7K Resistor | 1 |
| Breadboards | 1 |
| Connecting wires | As required in the circuit diagram |
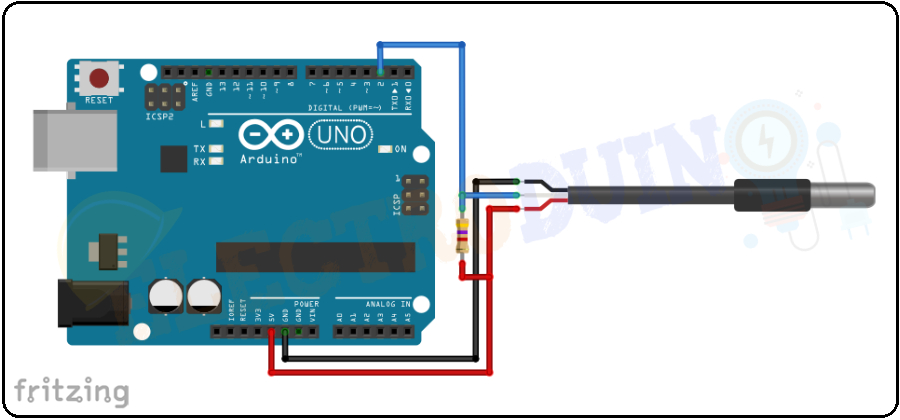
How to Connect DS18B20 Temperature Sensor with Arduino (Circuit Wiring)
Connecting a DS18B20 temperature Sensor to the Arduino is very easy, as we only need to connect 3 pins. We have to start the connection by connecting the GND pin of the sensor to the ground pin of the Arduino and the Vcc pin of the sensor to the 5 V output of the Arduino. Now we need to connect the Data pin (DQ) to any of the digital pins of the Arduino, here I used digital pin D2. We also have to add a 4.7 kΩ pull-up resistor between the Data pin and 5 V, which will keep the idle state for the 1-Wire bus high.
| DS18B20 TEMPERATURE SENSOR PIN | ARDUINO PIN |
| Ground Pin(GND) | GND Pin |
| Power Input Pin (VCC) | +5 Pin |
| Data Pin (DQ) | Digital Pin D1 and a 4.7k resistor connect between the Data pin and +5V Pin |
Circuit Diagram/Schematic of DS18B20 Temperature Sensor Arduino
Installing the DallasTemperature and OneWire Arduino libraries
The DS18B20 sensor supports a 1-Wire communication protocol which is somewhat complex and requires a bunch of code for data communication. To make the programming of these sensors easier we will be using the DallasTemperature Arduino library by Miles Burton. This library allows us to read out the temperature data from the sensors using some simple commands.
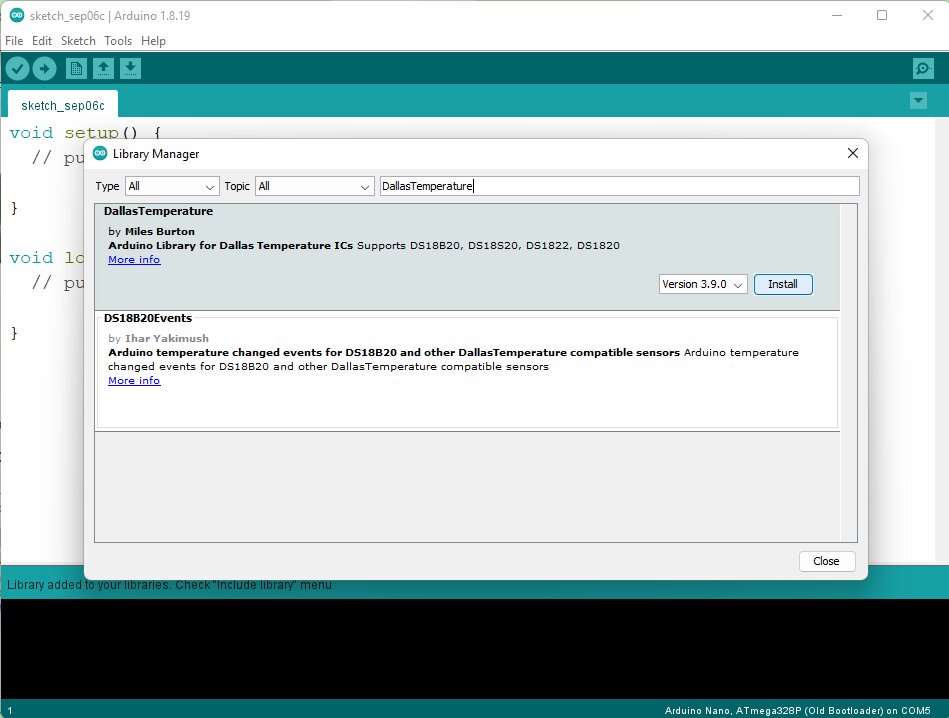
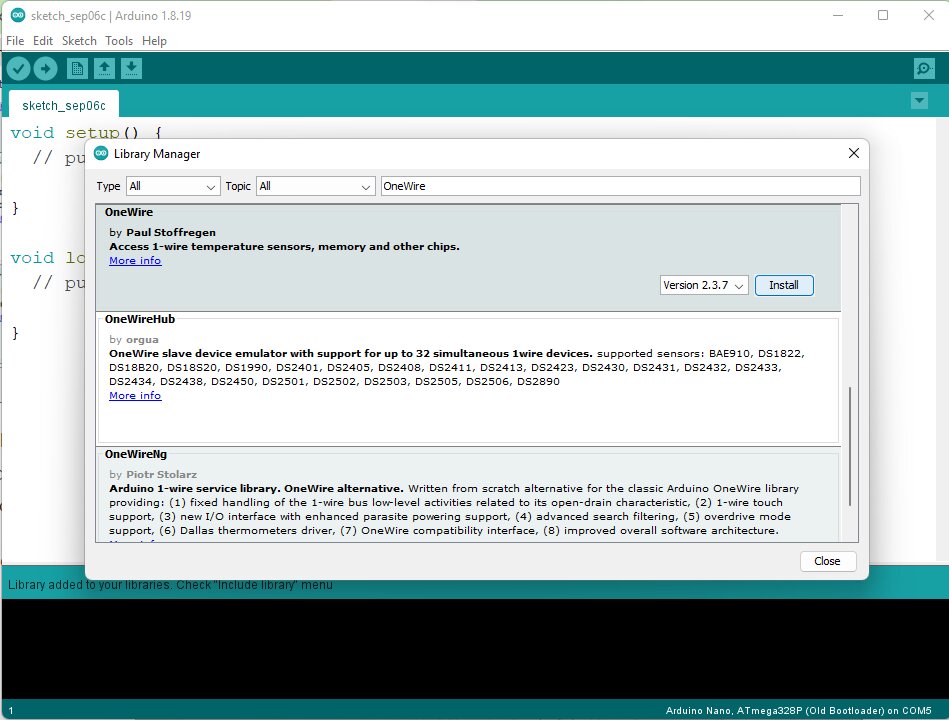
To install the DallasTemperature library and OneWire library. At first, open The Arduino IDE on your PC/computer and follow the steps Sketch > Include Library > Manage Libraries. Then the Library Manager window will open.
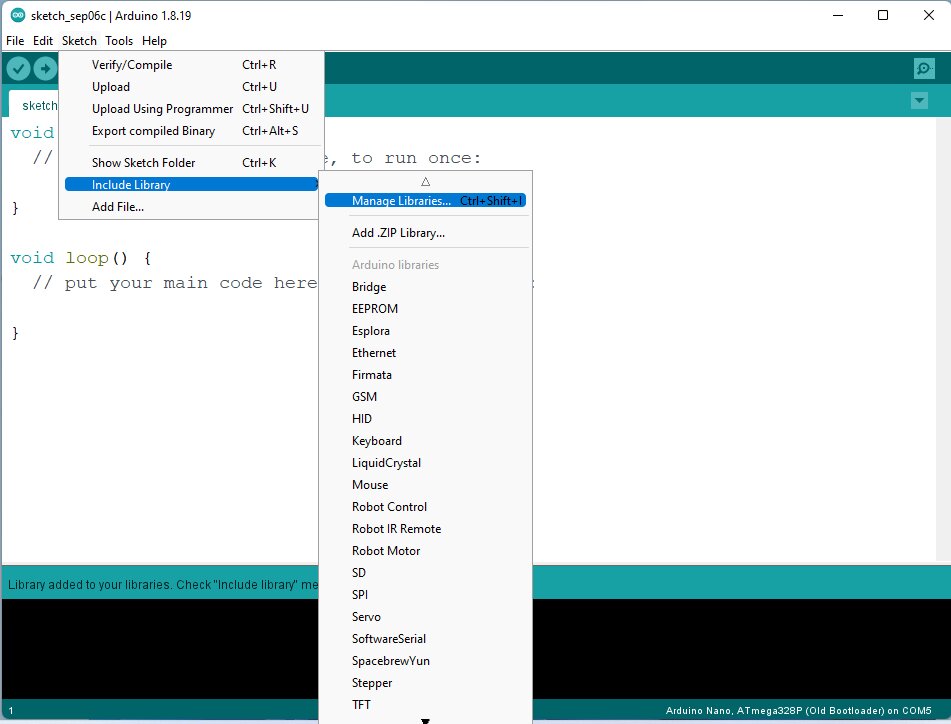
Now you can search for ‘DallasTemperature library’ and you get the DallasTemperature library by Miles Burton. Then Select the latest version of the library and click on Install.
Now you can search for the ‘OneWire library‘ and you get the OneWire library by Paul Stoffregen. Then Select the latest version and click on Install.
DS18B20 Temperature Sensor with Arduino Code
Using the following example code we can read the temperature values from the DS18B20 Sensor and display these values in the serial monitor of the Arduino IDE
/* DS18B20 1-Wire digital temperature sensor with Arduino example code.
More info: https://www.electroduino.com */

// Include the required Arduino libraries:
#include <OneWire.h>
#include <DallasTemperature.h>

// Define to which pin of the Arduino the 1-Wire bus is connected:
#define ONE_WIRE_BUS 2

// Create a new instance of the oneWire class to communicate with any OneWire device:
OneWire oneWire(ONE_WIRE_BUS);

// Pass the oneWire reference to DallasTemperature library:
DallasTemperature sensors(&oneWire);

void setup() {
  // Begin serial communication at a baud rate of 9600:
  Serial.begin(9600);
  // Start up the library:
  sensors.begin();
}

void loop() {
  // Send the command for all devices on the bus to perform a temperature conversion:
  sensors.requestTemperatures();

  // Fetch the temperature in degrees Celsius for device index:
  float tempC = sensors.getTempCByIndex(0); // the index 0 refers to the first device
  // Fetch the temperature in degrees Fahrenheit for device index:
  float tempF = sensors.getTempFByIndex(0);

  // Print the temperature in Celsius in the Serial Monitor:
  Serial.print("Temperature: ");
  Serial.print(tempC);
  Serial.print(" \xC2\xB0"); // shows degree symbol
  Serial.print("C  |  ");

  // Print the temperature in Fahrenheit
  Serial.print(tempF);
  Serial.print(" \xC2\xB0"); // shows degree symbol
  Serial.println("F");

  // Wait 1 second:
  delay(1000);
}
* Click here to Download the Code
Code Explanation
The first steps of the Arduino code start by including the OneWire.h and DallasTemperature.h libraries.
// Include the required Arduino libraries:
#include <OneWire.h>
#include <DallasTemperature.h>
Now declaring the Arduino pin to which the Temperature sensor’s Data pin is connected. In our case, the Data pin is connected to the Digital Pin D2.
// Define to which pin of the Arduino the 1-Wire bus is connected:
#define ONE_WIRE_BUS 2
To communicate with the sensor. At first, create a one-wire object and pass the sensor’s Data pin as a parameter. Then creates an object of the DallasTemperature class and pass the reference of the one-wire object as a parameter.
OneWire oneWire(ONE_WIRE_BUS);
DallasTemperature sensors(&oneWire);
In the setup(), establish serial communication between the Arduino and the PC and call the begin() function, and initialize the Serial Monitor at a baud rate of 9600.
void setup()
 {
  // Begin serial communication at a baud rate of 9600:
  Serial.begin(9600);
  // Start up the library:
  sensors.begin();
 }
In the loop section, at first, we call the requestTemperatures() function that instructs all Temperature sensors on the bus to perform a temperature conversion.
Then we call the getTempCByIndex() and the getTempFByIndex() methods to accept the index of the temperature sensor.
void loop()
{
// Send the command for all devices on the bus to perform a temperature conversion:
sensors.requestTemperatures();
// Fetch the temperature in degrees Celsius for device index:
float tempC = sensors.getTempCByIndex(0); // the index 0 refers to the first device
// Fetch the temperature in degrees Fahrenheit for device index:
float tempF = sensors.getTempFByIndex(0);
// Print the temperature in Celsius in the Serial Monitor:
Serial.print("Temperature: ");
Serial.print(tempC);
Serial.print(" \xC2\xB0"); // shows degree symbol
Serial.print("C | ");
// Print the temperature in Fahrenheit
Serial.print(tempF);
Serial.print(" \xC2\xB0"); // shows degree symbol
Serial.println("F");
// Wait 1 second:
delay(1000);
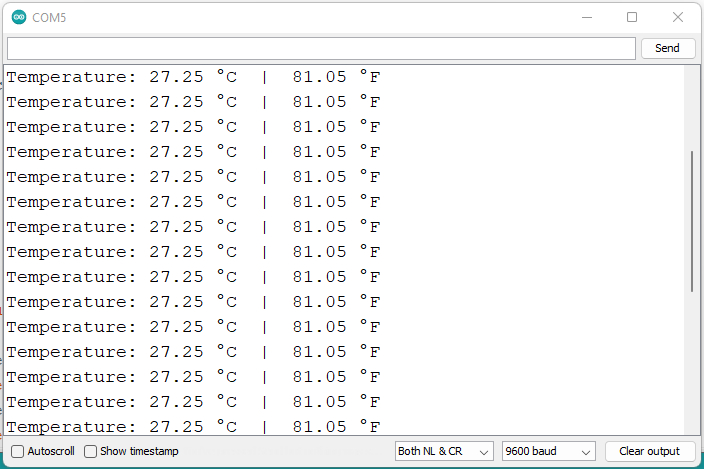
}Display Temperature Values on the Serial Monitor
Open the Serial monitor window (Ctrl + Shift + M) on Arduino IDE to get the Output Temperature Value.